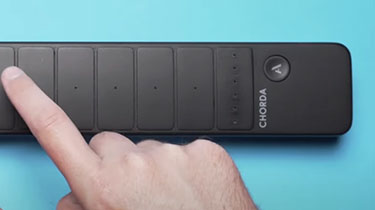
How does the (A) button work?
Similar to computer modifier keys like the Command key on Mac or the Control key on Windows, consider the (A) button as a functional or menu button. Changing your activity on Chorda and Orba is as simple as pressing the (A) button.

While it might seem overwhelming at first, rest assured, these functions become pretty intuitive once you get a hang of them. For those feeling uncertain or looking to learn some fun tricks, stay tuned. We'll practice together to ensure you're fully comfortable with the (A) Button in just three easy steps.
Overview:
In this blog, we'll explore the (A) button functions, specifically for Chorda but, these principles apply to Orba as well. By the end, you'll learn:
1. How to change Modes on Chorda: Drum, Bass, Chord, Lead.
2. How to Record a Loop on Chorda: Start recording your own loopable songs.
3. How to Play and Pause a Loop on Chorda
4. How to Change BPM on Chorda : Adjust song speed (make it faster/ slower)
5. How to Change Octaves on Chorda: Alter pitch (Higher/ Lower)
6. How to Toggle on/off arpeggiator on Chorda : a sequence of notes automatically played in a scale.
7. How to change keys on Chorda: Adjust the key (Brighter for Major, darker for Minor.)
8. How to Change Songs on Chorda: Switch between pre-loaded sounds.
10. How to clear and erase your song on Chorda
11. How to adjust volume-per-part on Chorda: Adjust the volume of your parts– fine-tune the bass track to be less loud, as they always say 🤪.
Step 1:
Starting in Drum mode, press the (A) button once. Now you're in Bass mode!

You'll also notice the intuitive color-coded LED lights, each corresponding to a specific mode. Drum Mode illuminates in Aqua, Bass radiates a Darker Blue, Chord Mode glows in Orange, and Lead mode stands out in Hot Pink.
These visual cues serve a practical purpose – you can use the (A) button to skip between these four modes, eliminating the need to cycle through them sequentially. By the end of this blog, we'll ensure you can expertly navigate through these modes.

Step 2:
Let's start with a simple exercise. Instead of tapping the (A) button as before, try pressing and holding it for a few seconds. You'll notice the pads on your instrument light up in a vibrant rainbow array. Do you recognize the Drum, Bass, Chord, and Lead colors mentioned before?

Now that you've got your rainbow, here's the fun part. While still holding A (and with the rainbow activated), tap the desired Instrument Mode on the first four pads. Voila! Now you're effortlessly skipping around modes!

That sums up the basics of it! To access functions on your instrument, simply hold A, wait for the rainbow, and press the desired function. But don’t go yet, since Chorda adds additional on-device functionality, the bridge also serves as a selector, so let’s go over that real quick.
Step 3:
The bridge is crucial for shifting keys, octaves, and changing songs right on Chorda—essentially, functions that require cycling through a sub-menu.

Let's quickly go over changing the octaves as an example. Similar to changing modes, start by holding down the (A) button until Chorda displays the rainbow-lit pads, then, with your other hand, press and hold pad 5. The bridge will illuminate red and green (or what we call the Christmas tree).
Now, while still holding down A, use your other finger (the one on pad 5) to adjust the octave up or down on the bridge.
The red lights will indicate an upward shift, while the green lights indicate a downward shift. Voila! The same method applies to changing keys, changing octaves, and changing songs. You will just need to choose the appropriate pad instead of pad.

Chorda Function Chart
| Function | Combination |
|---|---|
| Switch to Drum mode | (A) + Pad 1 (DRUM) |
| Switch to Bass mode | (A) + Pad 2 (BASS) |
| Switch to Chord mode | (A) + Pad 3 (CHORD) |
| Switch to Lead mode | (A) + Pad 4 (LEAD) |
| Change Preset | While holding (A), press Pad 1-4 to select your Mode. Then press Bridge up or down to change to the next or previous preset for that Mode. |
| Change Song | While holding (A), press Pad 9 (SONG). Then press Bridge up or down to change to the next or previous Song. |
| Toggle Arp on/off | (A) + Pad 6 (ARP) |
| Record | (A) + Pad 11 (REC) |
| Close a loop while recording | (A) |
| Stop recording | (A) + Pad 11 (REC) |
| Play/pause loop | (A) + Pad 12 (Play/Pause) |
| Restart playback from the beginning of the loop | Hold (A) + Pad 12 (Play/Pause) for 2 seconds). |
| Clear the loop on the current mode | Hold (A) + Pad 10 (CLEAR) for 2 seconds. |
| Clear all loops (in every mode) | Hold (A) + Pad 10 (CLEAR) for 4 seconds |
| Change BPM | Holding (A), press Pad 7 (BPM). Then press Bridge up or down to adjust tempo. Or, tap out your tempo by holding A and tapping Pad 7 (BPM). |
| Octave up | Holding (A), press Pad 5 (OCT). Then, press Bridge up. |
| Octave down | Holding (A), press Pad 5 (OCT). Then, press Bridge down. |
| Change the volume of the selected part | Holding (A), press volume up or down. (Ex. If you want to change the volume of Drum mode only, while in Drum mode, hold (A) and increase or decrease volume.) |
Get the full deep-dive
Curious about the history of the Artiphon (A) button?
If you're familiar with our first creation, INSTRUMENT 1, you'll recall the groundbreaking features and core principles that set it apart from other instruments –– from playing any instrument, gestural capabilities, and versatile MIDI control, the INSTRUMENT 1 marked a significant leap in the history of Artiphon and digital instruments.
Despite being a pioneer in digital instruments and a cornerstone of Artiphon's product lineup, INSTRUMENT 1, thought us there was room for improvement. The beginning stages of prototyping Orba highlighted the need for surpassing the eight presets available via the pressable knob present on INSTRUMENT 1. Though this pressable knob was an improvement from the crowded and intimidating buttons and knobs seen on other controllers and electronic instruments, Orba was envisioned as a more spontaneous controller. Its built-in looper not only empowers immediate creativity but also makes it a perfect tool for instant musical expression.
So if we wanted our instruments to inspire spontaneous musical moments throughout the day, simplicity became the guiding principle. We needed something that broke free from the hassle of multiple applications, cable connections, buttons, and knobs.
The solution was straightforward, we wanted one button to access all those features (Recording, octave changes, etc.): the magical (A) button.